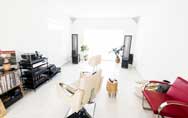
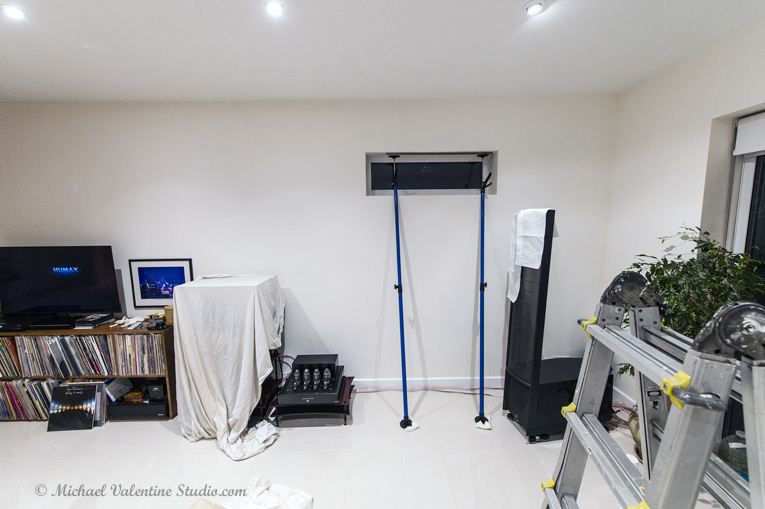
Click an image above to enlarge (before
& after acoustic room treatment)
I spent the last five years and beyond concentrating
on sourcing the right amplifier and other synergistic components
in the hi-fi chain. I knew a time would come when I would need
to consider acoustic room treatment!
After a six month break from music gigs,
festivals, communicating with promoters, photography and social
media (screen detox). I felt I had more time and space to explore
life outside the virtual world…
I used this extra time and space exploring
my garden, cultivating, nurturing, as well as keeping my listening
chair warm. My AMG Viella V12 turntable is my main source, but
it was currently in the safe hands of AMG Analog Manufaktur Germany
being treated to a tonearm cable rewire. I was also awaiting the
renewal of the Gyger II stylus for my Teatro cartridge (stylus
renewal by Northwest Analogue). CD’s were currently the
order of the day. Thankfully, my Musical Fidelity A3CR CD player
(over twenty five years old) has always risen to the occasion
and still gives most multi-thousand pound players a considerable
run for their money!
Upon delivery of my turntable a few weeks later,
I quickly set it to work. I knew run-in times of the new tonearm
cables and stylus would be around 60-80 hours, however, the positive
results of the above upgrades before the recommended run-in times
were obvious from the outset. Greater detail, more open mid-range,
deeper bass… BUT, such sonic improvements came at a price.
Now with more musical energy being delivered into the room, I
was forced to limit my listening sessions to one side of an album
(or one album at the most). It felt as though my listening room
was now a boxing ring with my mind and body being battered by
a prime Mike Tyson, or Claressa Shields. The room was ringing
without the need of a physical bell. Listening had now become
too fatiguing. Time to manage this extra energy and take a good
look at my room!
As with all things ‘hi-fi’ related,
there are multiple rules (set in stone or otherwise) expert opinions
and a few other bits and pieces in-between regarding acoustic
room treatment. Of course, every room is different (even if the
shape dimensions & measurements are the same). We all hear
music, instrumentation and vocals differently and have individual
expectations.
A few Key Characteristics of Dipole Electrostatics
Reduced Side Reflection:
Sound waves cancel out at the sides, minimizing side-wall reflections
and resulting in high clarity.
Room Interaction: They require specific placement—usually
2 to 3 feet from the back wall—to manage the rear wave reflection
properly.
Unique Soundstage: Because they radiate
energy in both directions, they often provide a more open, spacious
sound, though some designs (like JansZen) can be designed as non-dipoles
to simplify room placement.
Note: While many electrostatic speakers are true dipoles, some
hybrid designs (such as those from MartinLogan) use a dipolar
electrostatic panel for high frequencies paired with a conventional
monopolar woofer in a box. - Google AI
‘….Electrostatic panels,
which are true dipole speakers, produce a nearly-ideal controlled
dispersion radiation pattern. They send very little sound to the
sides, thereby minimizing side-wall reflections, whose short arrival
times tend to interfere with the perception of the direct sound.’
- MartinLogan
There are various aftermarket software packages
available to assist with acoustic room treatment (or correction).
My MartinLogan ESL11A speakers have Anthem room Correction (ARC)
software built in, which utilises the MartinLogan Perfect Bass
Kit (PBK). I experimented with this a few times, but was never
happy with what I consider ‘compressed sounding results.’
Perhaps such results were down to my poor knowledge and usage
of the software?
If you are looking for technical data such as standing wave -
sound wave – frequency response data, best to look elsewhere,
or locate the OFF button on your computer or phone now! My ears,
mind, body space and musical spirit are the only measuring tools
in use on this occasion.
Rear wall (behind speaker) reflections?
To ensure I was not completely on my own with
my thoughts, I briefly consulted with experts such as GIK Acoustics
before embarking on my DIY approach. GIK’s first advice
was to tackle reflections at the rear of the speakers by using
acoustic absorption panels on the back walls. This was actually
going to be my first plan of attack, as this approach was very
successful in my previous ‘smaller’ listening room.
Also, I had already lined up a couple of my own jazz
photographs ready to print on a pair of bespoke GIK absorption
panels. However, before committing to my proposed purchase
from GIK (costing almost £700) I was able to experiment
with the same acoustic absorption panels that were removed from
my previous listening room. Surprisingly, just a few minutes of
listening with absorption panels in place, I discovered that the
inclusion of these panels to the rear walls completely obliterated
emotion in the music. Playback of any type of music via CD or
vinyl format was now a completely sterile experience! I also experimented
with dispersion panels, but the results were also not
to my taste. I continued experimenting with various acoustic panel
material, depth & height, but the results remained the same,
so I moved on and altered my approach.
Floor acoustic corner bass traps
The DIY approach suits me here (and it suits
my pocket). Remember, one size does not fit all in any one, two,
three…. situation. I have not documented all experiments
here, but hopefully you may pick up a few hints and feel confident
enough to experiment yourself?
I continued with DIY build floor acoustic corner
bass traps. Again, using recycled acoustic material from my previous
listening room. Various thickness, height and positions were tested
until completely satisfied.
.jpg)
Ceiling acoustic corner bass traps
No DIY build attempts here (though I did consider
it). The precession cuts required for materials to fit perfectly
into the ceiling & wall corners (tetrahedron) are beyond my
tool box contents and expertise. This pair of ceiling acoustic
corner bass traps from UA Acoustics cost £49 and
are made from the same acoustic foam material used for my bass
traps. Available in a variety of colours and front panel design.
I painted the front perforated hardboard plate the same colour
as my walls..jpg)
.jpg)
Side window alcove area
I never considered my small window alcove to
be an issue, but after hours of listening using varied music genres,
I surmised this area caused a slight ‘echo’ anomaly.
This was easy (and cheap) to rectify using £16.99
BXI Acoustic Absorption Panels (cut to size) stuck to the inner
alcove walls.
Other areas of the room (room aesthetics)
Room aesthetics are more important to some than
others. If you share your room with others, then you will have
to consider their thoughts and feelings regarding the room layout.
Thankfully, my listening room is my space, but ‘I’
still need to live and be happy with the finished results aesthetically.
Being a minimalist certainly helps! Even wall fixtures such as
wall mounted photographs can play a part in the overall sound
of any room. There were two jazz themed photographs with acrylic
fronts hung under the side window alcove area (mentioned above).
Unfortunately these photographs had to be removed as they caused
slight sound reflections. At least I was able to relocate one
of the photographs further away from the speakers (now placed
between the television and turntable) as per photograph above.
The two live plants I have cherished for over
twenty years were in place alongside my previously owned Martinlogan
Scenario ESL’s, and now alongside my more recent larger
MartinLogan ESL11A speakers. I always considered these plants
to be natural acoustic diffusers! Further experimentation
highlighted both plants were more affective if trimmed to similar
low heights and overall girths. Optimal positioning was now closer
to the rear Glass infill & wall.
All done (for now)
The above experimentation took several weeks
to complete and much greater trial and error than I have documented.
My listening sessions are now more enjoyable than ever, without
any listening fatigue whatsoever. I hope the above proves helpful…
Right, ‘now back to the music!’
.jpg)
Cost
DIY Floor acoustic bass traps = £15
UA Acoustics ceiling corner bass traps = £49
Side window alcove BXI Acoustic Absorption Panels = £16.99
Total = £80.99
Robin Francis
© Michael Valentine Studio
April - May 2026


cr.jpg)